Form Validations

Today we’ll talk about form validations in AngularJS. AngularJS provides one of the coolest feature of form validations at the client-side. This type of validation would allow instant feedback on the state of the form as users are filling up the form. Some of the common form validations that are always handy are such as:

  • Required field
  • Minimum and maximum allowed length
  • Valid email
  • Show error message to let user know what is the requirement needed
  • Disable submit button when there are any errors detected

AngularJS allow us to implement form validations without a lot of extra work. Form validations are implemented using html5 tags or AngularJS directives. Developers can also create their own custom validations in AngularJS. Let’s take a look at some examples below:-

Required

To set an input field as a required input, a html5 required tag can be used.

<input type="text" required>

Matching a predefined regex pattern

AngularJS has a ng-pattern="/eg-pattern/" directive to ensure that the input matches with the predefined (regex)regular expression pattern.

<input type="text" ng-pattern="/^[a-zA-Z]+$/">

Minimum Length - ng-minlength

To set the minimum length requirement, we use ng-minlength={number}. The example below sets the minimum required length to be 3 characters.

<input type="text" ng-minlength=3>

Maximum length - ng-maxlength

On the other hand, to set the maximum length requirement, we use ng-maxlength={number}. The example below sets the maximum required length to be 10 characters.

<input type="text" ng-maxlength=10>

Number

To limit the user to only input numbers, we can set the input type to number.

<input type="number" name="age" ng-model="user.age">

Email

An email can also be validated in the input field by setting the input type to email.

<input type="email" name="email" ng-model="user.email">

Url

Url validation lets us validate if the input field represents a url. We do this by setting the input type to url.

<input type="url" name="homeurl" ng-model="user.twitter_url">

AngularJS Form Properties - $valid, $invalid, $dirty, $pristine

Below are some of the AngularJS form properties that are useful in helping us to validate the form. Various information can be obtained from the properties when they are applied to a form or input.

     
Property ng-class Description
$valid ng-valid Boolean - Indicate whether an item is currently valid based on the rules you set.
$invalid ng-invalid Boolean - Indicate whether an item is currently invalid based on the rules you set.
$dirty ng-dirty Boolean - True when the input/form has been used.
$pristine ng-pristine Boolean - True when the input/form has not been used yet.
     

In order to access these AngularJS properties, we can use the following method:

  • Access the form : <form-name>.<angular-property>
    • Example : myForm.$valid
  • Access an input : <form-name>.<input-name>.<angular-property>
    • Example: myForm.name.$valid

Below is an example of AngularJS form validations:

In this example, bootstrap formatting style are used to style the form. The form requirements implemented in this example form are such as:

  • Name field:
    • is a required field
    • minimum length is 3
    • maximum length is 20
    • only alphabets are allowed
  • Age field:
    • only numbers
    • minimum age is 10
    • maximum age is 200
  • Email field:
    • valid email address

Some takeaways from this example:

  • Different error message can be printed to the user based on what error the user encounters.
  • Bootstrap provides styling for the error fields such as help-block to print error messages in red text.
  • Using AngularJS form properties to check for any errors on the input field.
  • ng-disabled can be used to prevent user from submitting when there are errors.

Git branch

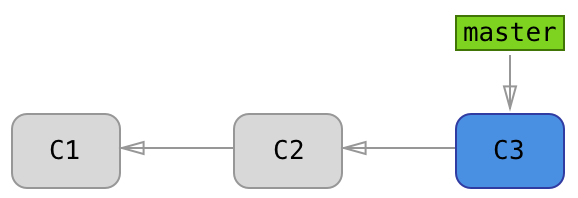
Branching is a very useful feature in version control. When a new branch is created, you would have a new working directory, staging area and project history. Commits from the new branch would be recorded in the history of the current branch. The default branch name in Git is master. Every time you make a new commit, the master moves forward and points to the lastest commit. The illustration below shows that you have make three commits and the ‘master’ points to the latest commit(C3). git_branch_master

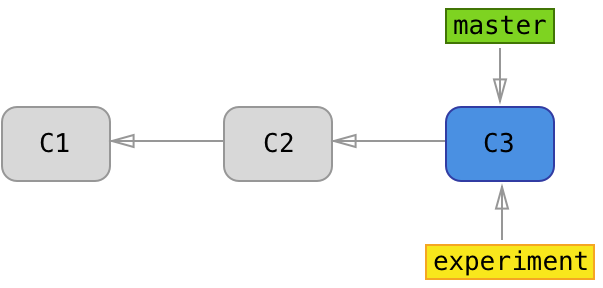
Next, run git branch experiment. Running this command will create a new branch called experiment. Now, we would have a new pointer that points to the 3rd commit which is the lastest commit that we have.

$ git branch experiment

git_branch_experiment

Git checkout

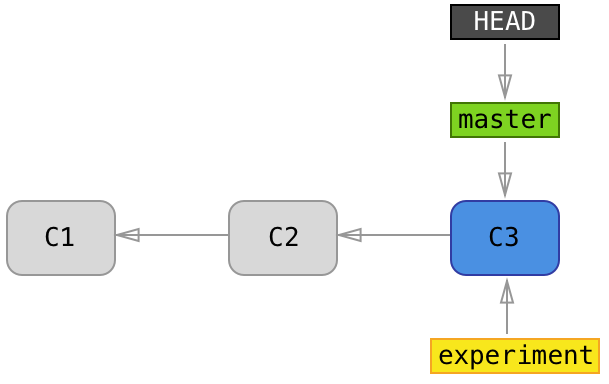
You may wonder, how would git know which branch you are on and how to switch between branches in Git. Git has a special HEAD pointer that points to the current local branch that you are pointing to. git_head_pointer

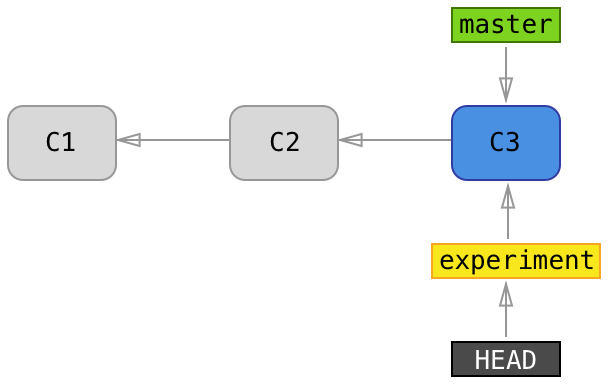
git branch experiment command only creates a new pointer to the current head commit. In order to switch and start your development on the new experiment branch, you need to run git checkout experiment command. HEAD pointer now points to experiment branch.

$ git checkout experiment

git_co_experiment

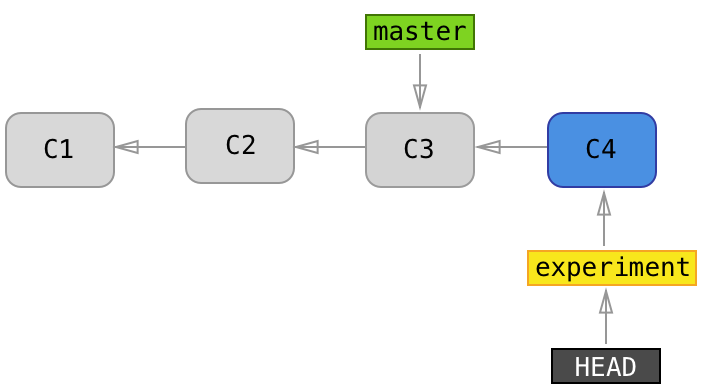
We’ll go ahead and start experimenting our feature in the experiment.js file. After some testing, we confirm that our experiment feature succeded and we are ready to commit! We’ll go ahead and commit the changes into the experiment branch. We’ll see a new commit, C4.

$ mvim experiment.js
$ git commit -m "create new button object" 

git_commit_from_exp_branch

Since we have finish with our experiment, we may want to switch back to our master branch and continue our developement. We can do that using the checkout command like how we did earlier git checkout master. This command will move the HEAD pointer back to master and revert the files in our working directory to the snapshot of commit 3 (C3).

$ git checkout master
$ mvim experiment.js
$ git commit -m "print msg to console" 

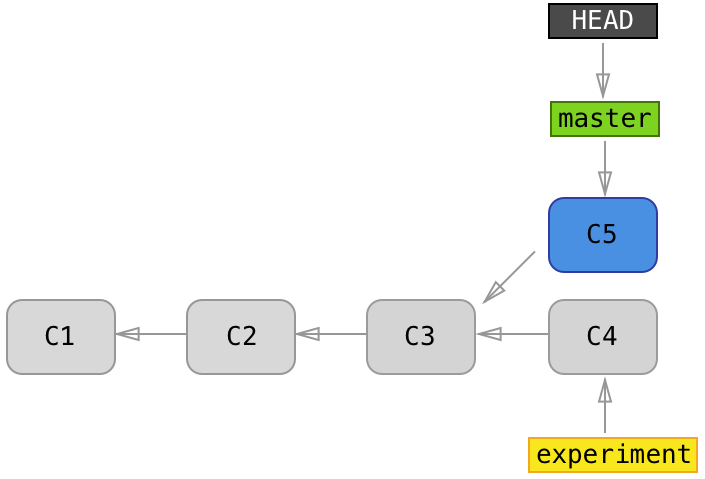
Let’s make changes to the experiment.js file from our master branch and commit the changes. Doing this would cause the git project history to diverge.

git_commit_from_master

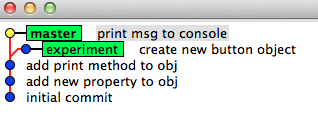
I have created a git project based on the illustration. Below is a screen shot from gitk, a commit viewer for git. In this git project history, we have a total of 5 commits and 2 branches(master and experiment). We’ll talk about rebase and merge next to see how we can integrate the changes done on one branch to the other.

gitk_all

Git merge and git rebase

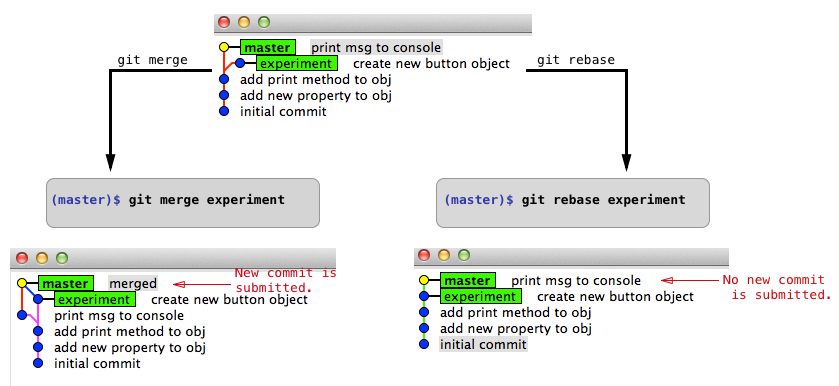
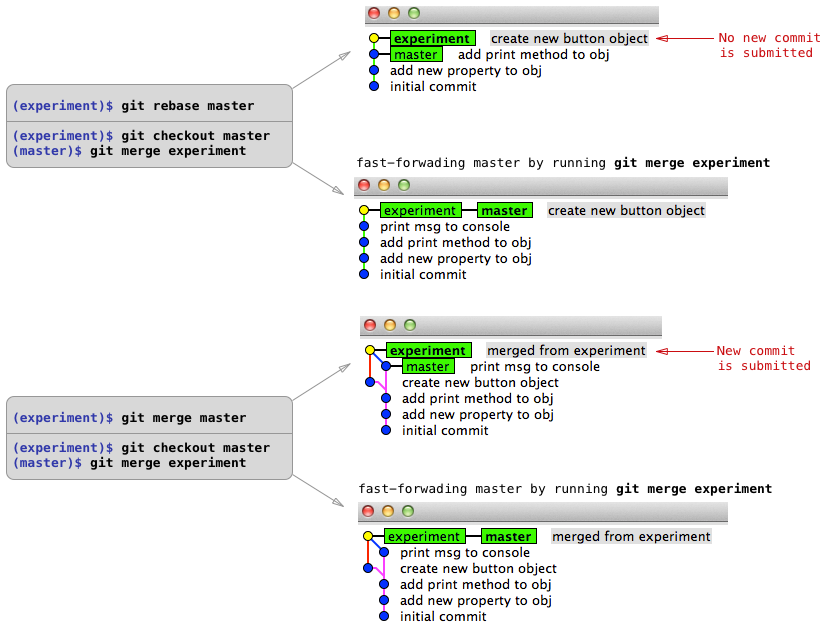
We have seen that git branch allow us to create new branches on git and start development from the newly created branch leaving our master branch independent of the new branch. This feature is very useful for developers to do experiment and allow every developer to work independently at their own branch. git branch causes the git project history to diverge so how can we integrate the changes? Git offers git merge command to merge the changes on the branch. Asides from git merge, git rebase also allow us to integrate the changes done on one branch to the other. Below is an example of git merge and git rebase ran with the HEAD pointer pointing at the master branch.

git_merge_rebase

Another example I have below is running git merge and git rebase with the HEAD pointer pointing at the experiment branch.

git_merge_rebase_experiment

The key takeaways from this is that git merge and git rebase will integrate the changes done on one branch to the other. However, how git does the integration in git merge and git rebase are different. Also, depending on the branch when you run the git rebase command, the result seen from the git commit view is different. Below are some recommended reference for the git commands discussed above:

Scope

There are two types of scopes in JavaScript; local and global scope. Any variables or functions that is declared outside of a function body is deemed a global scope. Global scope can be accessed and manipulated from any scope. On the other hand, variables and functions declared inside of a function body is deemed a local scope. Local scope can only be accessed and manipulated within the function body of which they are declared.

1
2
3
4
5
6
7
8
9
10
11
12
13
14
15
16
17
18
var myVar = 'global variable';
console.log('myVar value before myScope function: '+ myVar); // prints global variable
function myScope()
{
    var myLocalVar = 'local variable';
    function myInnerScope()
    {
      var myInnerLocalVar = myLocalVar; // myLocalVar can be accessed from myInnerScope
      console.log(myInnerLocalVar); // prints local variable
      myVar = 'overwrite global'; // myVar is global variable, can be accessed from myInnerScope
      console.log('myVar value overwrite from myScope function: ' + myVar); // prints overwrite global 
    }
    myInnerScope();
    console.log(myLocalVar); // prints local variable 
    console.log(myInnerLocalVar); // undefined because myInnerLocalVar only can be accessed in myInnerScope
}

myScope(); // invoke the global function

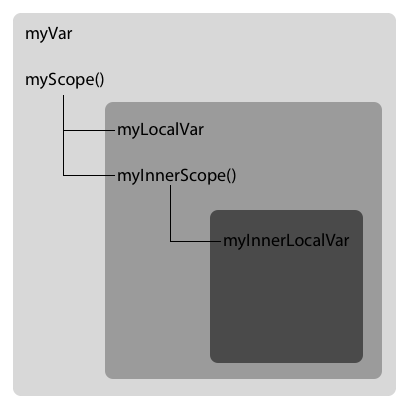
Below is a simple illustration of the scope of variables and functions based on the above code example. From the illustration, you can clearly see that the myVar and myScope() are global scope and can be accessed from any of the local scopes. Note that the myInnerLocalVar has the most limited scope in this example and it can only be accessed inside myInnerScope. Scope javascript

Context

In the web browser environment, the global context belongs to the window object. Therefore, all global variables and functions are created as properties and methods for the window object. When an execution stack has executed all of its code, the variables and functions defined within that context will be destroyed. However, global context will not be destroyed until the user exits the application by closing the web page.

Function call in JavaScript will have its own execution context. You can visualize execution context as a stack whereby global context is the base of the stack and each function call will push a new execution context on top of the stack. When a function(f1) has finished executing, the f1 execution context will be popped and return the control to the previosly executing context.

The execution context of a function object can be accessed using the this keyword. The usage of this is explain below.

The this Keyword

Whenever a function is invoked in JavaScript, a list of parameters is passed to the called function as arguments. The this parameter is also passed implicitly to the called function. this keyword behaves differently in JavaScript compared to other programming languages. In JavaScript, this is determined by how a function is being invoked. Please refer to my earlier blog post about types of function invocation in JavaScript

###1. First Example - Invoke as function

1
2
3
4
var myVar;
console.log(myVar); //prints undefined
window.myVar = 10;
console.log(this.myVar); //prints 10

The above example shows that the global variable, myVar is a property of the window object. An undefined result is obtained when myVar is declared without any value assigned to it. The window.myVar = 10 assigns a value of 10 to the myVar property of the window object. Using console.log(this.myVar) will give the value of 10 because this is refering to the window object.

###2. Second Example - Invoke as method

1
2
3
4
5
6
7
8
9
var myObject = {
  myFunction : function()
  {
    return this; //this is refering to myObject
  }
};

console.log(myObject.myFunction() === myObject); // prints true
console.log(myObject.myFunction() === window); // prints false

myFunction is the method of the myObject object. this in this example is refering to myObject and not the window object.

###3. Third Example - Invoke as constructor

1
2
3
4
5
6
7
8
9
10
11
12
13
14
function Person(name)
{
  this.name = name;
  this.myFunction = function()
  {
    return this; //this refers to whichever object that calls the myFunction method
  }
}   

//invoke as a constructor
var person1 = new Person('Nancy');
var person2 = new Person('Peter');
console.log(person1.myFunction() === person1); // prints true
console.log(person2.myFunction() === person2); // prints true 

Whenever the new keyword is used to invoke a function, this means that the function is invoked as a constructor. Thus, person1 and person2 would have reference to the myFunction method available in the Person constructor. this in this example would refer to whichever object that calls the myFunction method. For example, if myFunction() is invoked by the person1 object, then this refers to person1.

###4. Fourth Example - Invoke as call() and apply()

1
2
3
4
5
6
7
8
9
10
11
12
13
14
15
16
17
18
19
20
21
function add()
{
  var sum = 0;
  for (var n = 0; n < arguments.length; n++)
  {
    sum += arguments[n];
  }  
  this.sum = sum; //this refer to the object parameter passed using the call() or apply() function
}

var price1 = {};
var price2 = {};
add.call(price1, 2, 5);
console.log(price1.sum); // prints 7
add.apply([price1, 2, 5]);
console.log(price1.sum); // prints 7

add.call(price2, 12, 2);
console.log(price2.sum); // prints 14
add.apply([price2, 12, 2]);
console.log(price2.sum); // prints 14

In this last example, call() and apply() are used to invoke the add function. The parameter of call() and apply() consists of the object name itself. Thus, we can explicitly specify the object that we would like to refer to when calling the add function.

When I was writing this blog post, I came across a few good references that I would like to recommend:

Function Invocation in JavaScript

There are a few ways how we can invoke a function in JavaScript language. In this blog post, I am going to talk about the different types of function invocation in JavaScript.

##1. Invoke as A Function This is the most straight forward way of how functions can be invoked in JavaScript. The example below shows how functions can be declared and then invoked as a function.

1
2
3
4
5
6
7
8
9
10
11
12
13
function hello() //method 1
{
  return "called hello";
}

var hi = function() //method 2
{
  return "called hi";
}

//invoke as a function
hello();
hi(); 

##2. Invoke as A Method In JavaScript, an object can have a property that is assigned to a function. The function will then be invoked by referencing it through that property; i.e: invoke as a method of that object.

1
2
3
4
5
var objectA = {}; //declaring an object
objectA.myFunction = function(){}; //create a myFunction property and assign it to a function.

//invoke as a method
objectA.myFunction();

##3. Invoke as A Constructor Functions can be used as a constructor in JavaScript. The new keyword is used to invoke a function as a constructor.

1
2
3
4
5
6
7
function Person(name)
{
  this.name = name;
}   

//invoke as a constructor
var person1 = new Person('Nancy');

When a function is declared as a constructor, the following occurs:

  • A new object is created.
  • this value of the constructor is assigned to the new object.
  • Any properties available are added to the new object.
  • Return the new object.

##4. Invoke using apply() and call() methods The apply() and call() methods exist for every function in JavaScript. The apply() method is used by passing two parameters which are the object to be used as the function context and an array of values to be used as the invocation arguments. As for the call() method, an argument list is passed instead of an array.

1
2
3
4
//using .apply() by passing an object and an array
myFunction.apply(object1,[]);
//using .call() by passing an object with an argument list
myFunction.call(object1,1,2,3);

All the above types of invocation are common in the JavaScript programming world. Knowing the different types of function invocation are crucial in understanding how this works in JavaScript. I will explain how this works in my next coming blog post. Stay tune!

Having fun with CSS Shapes

CSS is a style sheet language that is used to style the look and format of a document written in markup language. We could also use CSS to create a lot of different shapes. In order to create shapes using CSS, you would need to create a div element in HTML. A div element is essentially a rectangle/square. There are two types of div element that you can create; a “div id” or a “div class”. The important thing to note about the differences between a “div id” and a “div class” is that the id selector takes precedence over class selector. There is a good discussion thread in stack overflow that discuss about the differences between using “div id” vs “div class”. The example below shows how to create a circle with CSS.

1
2
3
4
5
6
7
8
9
10
11
12
13
14
15
16
17
18
<!DOCTYPE html>
<head>
<style>
.circle
{
    width: 200px;
    height: 200px;
    background: blue;
    -moz-border-radius: 100px;
    -webkit-border-radius: 100px;
    border-radius: 100px;
}
</style>
</head>

<body>
<div class="circle"></div>
</body><!--end div circle-->

Below are some shapes demo that I have created using jsfiddle.

While writing this blog, I came across a good reference for creating shapes in css-tricks; ShapesOfCSS. This site contains lots of different shapes created using CSS. Put on you creative hat and start creating shapes with CSS! I created an Android Robot. What about you?

Android Robot